List Filter
Updated 1 week ago
The List Filter element allows to filter items within "list" elements on the same page. The element is available within Live Builder and WPBakery builders.
Currently, the List Filter works only with Post List and Product List elements.
Sources for Filtering #
Full list of supported sources, that can be used to filter posts (of any post type):
- Post attributes:
- Post Type
- Author
- Date of creation/publication (date value)
- Date of update (date value)
- WooCommerce related:
- Price (numeric value)
- In stock products (on/off value)
- Onsale products (on/off value)
- Featured products (on/off value)
- Taxonomies (all taxonomies available for editing in the admin area)
- ACF fields with the following types:
- Text
- Number (numeric value)
- Range (numeric value)
- Select
- Checkbox
- Radio Button
- Button Group
- True / False (on/off value)
- Date Picker (date value)
- Date Time Picker (date value)
Selection Types #
Selection type is the way how visitors can select filter source values on the frontend. Selection type depends on the filter source.
Checkbox #
All sources can be selected via this selection type.
For Post Types there are the following rules to show them in the List Filter:
- only types that can be shown in the Pots List are available
- each type shows its plural label of the post type name
- post types sorted alphabetically
Available post types can be changed using the PHP hook us_grid_available_post_types. Note that hook applies for all List/Grid elements.
For Authors there are the following rules to show them in the List Filter:
- only users with published posts (of any type) are displayed
- each author is displayed with First Name and Last Name, if both fields are empty, the value from "Display name publicly as" will be used
- authors (except manually selected) are sorted alphabetically
- manually selected authors can be sorted manually in the List Filter interface
- the author selection will not be displayed on author archive pages
The arguments for retrieving authors from the database can be changed using the PHP hook us_list_filter_author_args.
For Taxonomy sources there are the following rules to show their terms in the List Filter:
- empty terms (without assigned posts) are not displayed
- if the List Filter is used on the same taxonomy archive page, only child terms will be displayed, if there are no child terms, the corresponding filter source will not be displayed
The arguments for retrieving terms from the database can be changed using the PHP hook us_list_filter_terms_args.
For Numeric sources it's possible to divide all existing values (taken from the database) into groups by specific range that can be set in the "Numeric Values Range" option. This option supports decimals with a dot as separator: 0.5
You have 10 products with the following prices:
6, 10, 12, 12, 13, 14, 21, 22, 23, 23.
If Numeric Values Range = 10, the following checkboxes will be shown:
- 0-10
- 10-20
- 20-30
If Numeric Values Range = 5, the following checkboxes will be shown:
- 5-10
- 10-15
- 15-20
- 20-25
Note the "15-20" checkbox will be displayed even if there are no products in that price range.
If Numeric Value Range = 0, or empty, all existing values will be shown:
- 6
- 10
- 12
- 13
- 14
- 21
- 22
- 23
Product price values are always formatted using WooCommerce Currency Options.
For Date sources all existing values (taken from the database) are always divided into groups by year or month, depending on the "Date Values Range" option. Values are sorted from newest to oldest.
Radio buttons #
All sources can be selected via this selection type.
The values are displayed using the same logic as described for the Checkbox selection type.
The "Any" label is added as the default selected value, which means no filters are applied (radio buttons always must have one value selected). You can change this label in the "First Value Label" option.
Example: You have posts with categories "Video", "Photo" and "Animation", you want to display the filter of the corresponding category, but you want only "Video" posts to be displayed on page load.
In this case, leave the "First Value Label" field empty in the List Filter, the first real value (Video) will be selected by default on page load. But the filter will not be applied, so you need to configure the corresponding Post List to display posts of the "Video" category.
Dropdown #
All sources can be selected via this selection type.
The values are displayed using the same logic as described for the Checkbox selection type.
The "Any" label is added as the default selected value, which means no filters are applied (the dropdown always must have one value selected). You can change this label in the "First Value Label" option.
Example: You have posts with categories "Video", "Photo" and "Animation", you want to display the filter of the corresponding category, but you want only "Video" posts to be displayed on page load.
In this case, leave the "First Value Label" field empty in the List Filter, the first real value (Video) will be selected by default on page load. But the filter will not be applied, so you need to configure the corresponding Post List to display posts of the "Video" category.
Range Slider #
Only numeric sources can be selected via this selection type.
Shows a slider that allows you to select a range between the minimum and maximum values. By default, the minimum and maximum values are taken from the database. You can change them via the "Min Value" and "Max Value" options.
Step Size, Min Value, Max Value options support decimals with a dot as separator: 0.05, 1.00, 1.50
Range Input #
Only numeric sources can be selected via this selection type.
Shows two input fields for minimum and maximum values. By default, their placeholders show real min and max values from the database. You can change placeholder labels via the "Min Value" and "Max Value" options.
"Min Value" and "Max Value" options do not limit the ability of visitors to enter any data on the frontend.
Date Picker #
Only date sources can be selected via this selection type.
Shows one or two input fields with a date picker available by a click, depending on the Fields to Show setting:
- Exact date - shows a single field. Once filled, it will filter a list and show only the posts with the matching date.
- Start date - shows a single field. Once filled, it will filter a list and show the posts with dates matching or dates after the specified one.
- End date - shows a single field. Once filled, it will filter a list and show the posts with dates matching or dates before the specified one.
- Start + End Dates - shows two fields. Once both filled, it will filter a list and show the posts matching the specified period.
By default, the manual input from keyboard is enabled for all fields.
The Date Format option affects the date value shown inside fields only. It doesn't affect on the URL format.
The style can be overridden with custom CSS code.
The base is the jQuery Datepicker Widget. You can change its behavior via the us_list_filter_datepicker_options PHP hook and available options.
List To Filter #
The "List to filter" setting in the More Options tab allows specifying the target Post List to be filtered. By default, it applies to the first Post List on the page, but you can change it to "Custom List selector" and specify the CSS class or ID of the needed list(s).
This option allows filtering multiple lists on the page if the relevant class or ID is added to them.
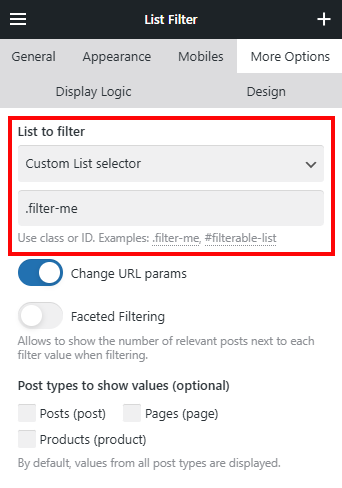
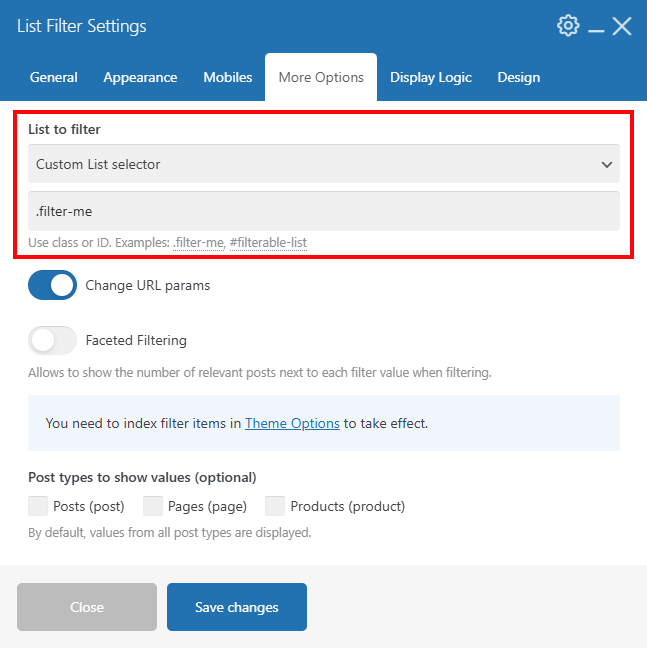
If you wish to use Faceted Filtering for multiple Post Lists based on their CSS class or ID, ensure each of them has the "Use URL params to show results" switch activated.
Change URL Parameters #
In the List Filter "More Options" tab you can enable/disable the Change URL Params switch.
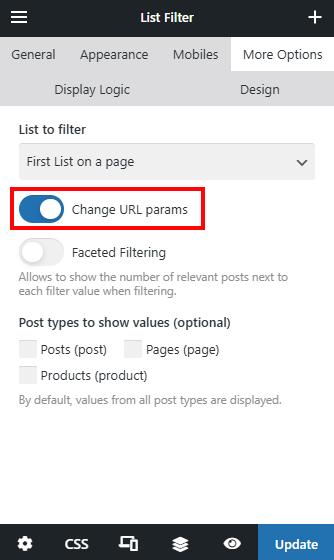
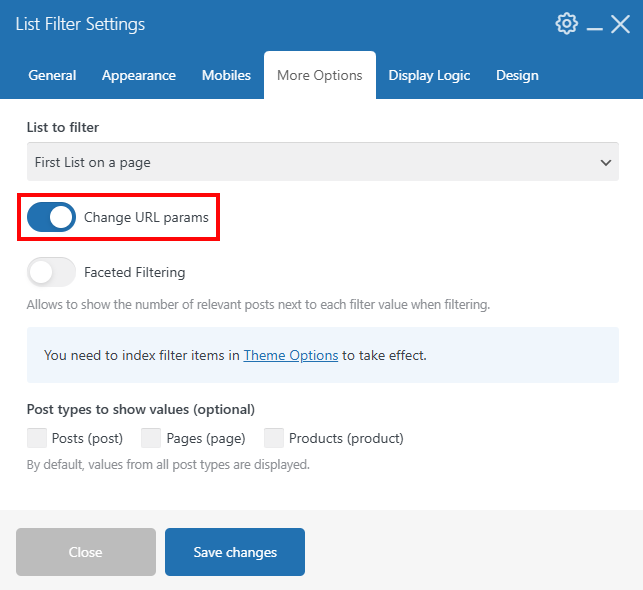
By default, it's active and reflects the specified filter value(s) in the URL. For example, filtering the list of posts by the "Photography" category adds the _category parameter to the URL:
http://example.com/my-page/?_category=photography
It allows the creation of external links that lead to the list with the pre-defined combination of filters applied.
Every URL parameter:
- has the "_" prefix, it can't be changed due to avoid conflicts with built-in WordPress logic
- has unique name predefined automatically. For example, if you create a custom field named as "category", its name in URL will be the "category8" or similar to avoid conflict with built-in categories for posts. If you add your own parameters using custom PHP, you should make sure they are unique.
- encodes its value (not name) if it has any symbols except latin letters, digits, dash
-and underscore_
If you want the Post List / Product List will take into account URL params after page reloading, you need to enable the "Use URL params to show results" option in their settings.
Faceted Filtering #
Read more in this separate article.
Limit of Showing Values #
Since the List Filter parses the website's database (which can contain thousands of posts, terms, meta values), there is a predefined limit that prevents the page output from slowing down or even being interrupted.
The default limit is 250 values per filter item, means the List Filter can show only 250 checkboxes, radio buttons, dropdown options for every filter source.
When the limit is reached, the message "Only the first 250 values are displayed" will appear on the frontend.
This limit can be changed via the PHP hook, place the following code into your functions.php file:
add_filter( 'us_list_filter_values_output_limit', function( $limit ) {
	return 1000;
} );
For the Live Preview the limit is 50 and cannot be changed due to performance reasons.
FAQ & Customizations #
To apply any of the custom PHP code examples below, you will need to use a child theme.
How to disable page scrolling to filterable list #
Open the List Filter "More options" tab and check the "Scroll to list" switch. Deactivate it to prevent scrolling to the relevant Post/Product List when filtering.


How to add a simple horizontal filter #
You can add a simple horizontal filter to your list, like in the example below:

To implement a similar layout, follow the steps below:
- Add a List Filter element above your list.
- In its General settings, select a relevant Source, specify the Selection Type as "Radio Buttons." Also, activate the "Values as buttons" switch and pick a relevant Button Style.
- In the Appearance settings, switch the Orientation to "Horizontal", specify the Layout of Filter Items as "Without Titles," and pick the "Center" Alignment.
Is it possible to use multiple List Filter elements applying to the same list? #
Yes. But if you have multiple visible List Filter elements, they should have different sources. The same source will work correctly if only the one List Filter is visible at a time.
Is it possible to filter multiple lists via one List Filter? #
Yes. Check the "List to Filter" option description.
How to change filtering by taxonomies from "OR" to "AND"? #
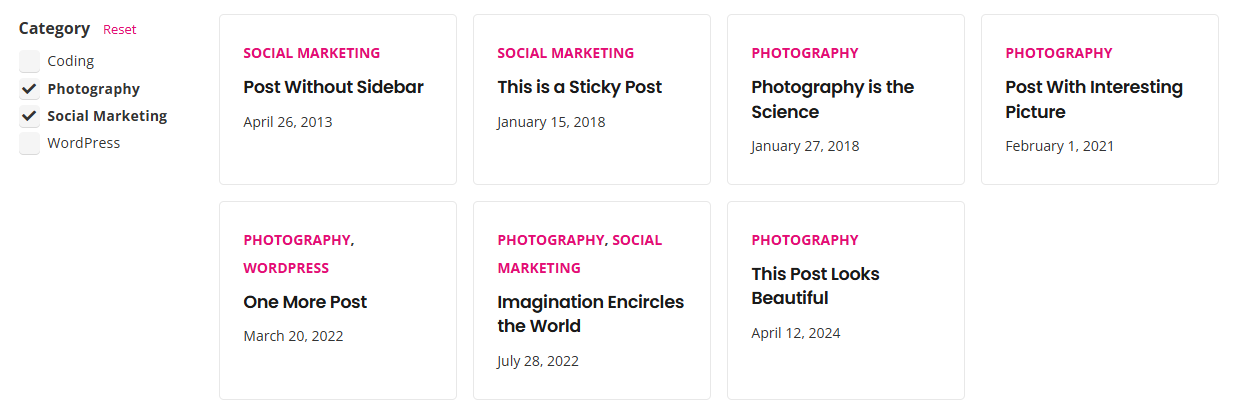
In Impreza version 8.36 the List Filter has the Selection Operator option (it only applies to checkboxes):
- OR - the list shows items that match at least one of the chosen values.
- AND - the list shows items that match all chosen values simultaneously.


How to sort/reorder the showing taxonomy terms? #
- manually selected terms can be sorted manually in the List Filter interface
- all terms related to WooCoomerce products can be sorted by the default admin interface. Learn more
- in other cases, the easiest way is using the Category Order and Taxonomy Terms Order plugin
- the last way is using the PHP hook
us_list_filter_terms_args
How to filter by a custom field not from ACF? #
In case you don't use the ACF/SCF plugin and want the List Filter show (and filter by) your custom field values.
add_filter( 'us_get_list_filter_params', function( $params ) {
  $params['unique_param_name'] = array(

    // Required attributes
    'label' => 'My custom field', // shown on the frontend
    'group' => 'Custom filter items', // shown in List Filter settings only
    'source_type' => 'meta',
    'source_name' => 'my_field_name', // the original slug of your custom field

    // Optional attributes
    'value_type' => 'numeric', // can be 'numeric', 'bool', 'date'
    'bool_value_label' => 'In stock only', // only applied if 'value_type' => 'bool'
    'bool_value' => 'instock', // only applied if 'value_type' => 'bool'
    'value_compare' => 'like', // use this only if values in database are serialized
  );
  return $params;
} );
In the code above:
unique_param_namewill be used in URL. This value must be unique to avoid conflicts with predefined filter params.value_typewill define which selection type will be available for your custom field'value_compare' => 'like'is used only when the relevant custom field contains serialized data, in other cases remove this line.
After adding that code the List Filter will automatically parse the database for values from the specified custom field and display them based on the selection type and other List Filter settings.
How to add a custom filterable parameter with unique logic? #
If you want to implement custom filtering conditions, you need to use two PHP hooks.
The code below will display the "Hide posts from previous years" checkbox. If checked, only posts published this year will be shown.
add_filter( 'us_get_list_filter_params', function( $params ) {
    $params['hide_old_posts'] = array(
        'label' => 'Actual posts', // title shown on the frontend
        'group' => 'Custom filter items', // shown in List Filter settings only
        'source_type' => 'none', // any value except 'post', 'tax', 'meta', 'woo'
        'value_type' => 'bool', // will show a sinlge checkbox on the frontend
        'bool_value_label' => 'Hide posts from previous years', // checkbox label
    );
    return $params;
} );

add_filter( 'us_apply_filtering_to_list_query', function( $query_args, $name, $values ) {

    // Hide posts from previous years
    if ( $name == 'hide_old_posts' AND ! empty( $values ) ) {
        $query_args['date_query'] = array(
            'year' => wp_date( 'Y' ),
        );
    }

    return $query_args;
}, 10, 3 );
In the code above the hide_old_posts is the unique param name and will be used in URL.
How to change colors of taxonomy checkboxes based on their custom field? #
The us_list_filter_value_html_atts hook allows to add html attributes to every filterable value (checkbox or radio button).
Set the ACF "Color Picker" field to the desired taxonomy, e.g. category. Then use the following PHP code:
add_filter( 'us_list_filter_value_html_atts', function( $atts, $value, $item_name ) {
    if (
        $item_name == 'category' // name of desired taxonomy
        AND ! empty( $value['term_id'] )
        AND $color = get_term_meta( $value['term_id'], 'category_color', TRUE ) // 'category_color' is the name of used custom field
    ) {
        $atts['style'] = '--category-color: ' . $color . ';';
        $atts['style'] = '--category-contrast-color: ' . us_get_contrast_bg_color( $color ) . ';'; // sets black or white depending on the color lightness
    }
    return $atts;
}, 10, 3 );
After that the List Filter will output the relevant color for every category value:

Add the following custom CSS code:
.w-filter-item[data-name="category"] .w-filter-item-value label > input {
  background: var(--category-color, var( --inputs-background, transparent ) ) !important;
  color: var(--category-contrast-color, var( --inputs-text-color, inherit ) ) !important;
}
and your checkboxes will be colored on the frontend.
