Analytics Event Tracking
Updated 2 years ago
You can add GA Events tracking to almost any element presented with Impreza theme. In most times you just need to add additional class to an element and add a simple JS snippet with code that will send the Event info.
This guide doesn’t cover basic Google Analytics setup for your site. If you need information for basic setup, visit this page. Also, if you are a new to GA Events specifically, read this guide.
We described 3 examples of Event tracking applied to the theme elements:
Button: example with custom CSS class #
You can have lots of buttons at one page, and you might need to add few Events trackings for buttons. That’s why it is important to attach an Event to particular button. Fortunately most of theme Elements have ‘Extra class name’ field in their settings, so you can distinguish needed Element(s) with it.
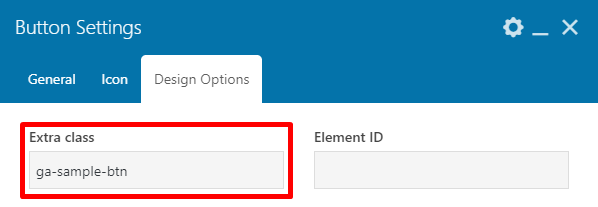
So as first step, create a new button, set wanted URL, Label and other params, then add unique class to ‘Extra class name’ field:

Then add Raw JS element below it and add following code to it:
<script type="text/javascript">
jQuery(document).ready(function(){
  jQuery('.ga-sample-btn').on('click', function() {
    ga('send', 'event', 'Buttons', 'click', 'Sample Button');
  });
});
</script>
Row with these elements will look like this:

Now if you save the page and click the button, it will send GA Event with category named ‘Buttons’, action named ‘click’ and label named ‘Sample Button’.
Contacts: example for inner components #
Let’s try something a bit more complex: we will send GA Event not for the whole element, but for its components.
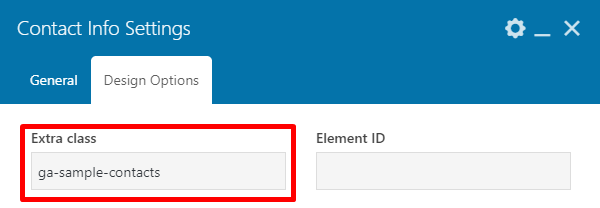
Same as in the previous example, at first create a new Contacts element. Fill the fields and add unique class, since sometimes you may have couple of such elements:

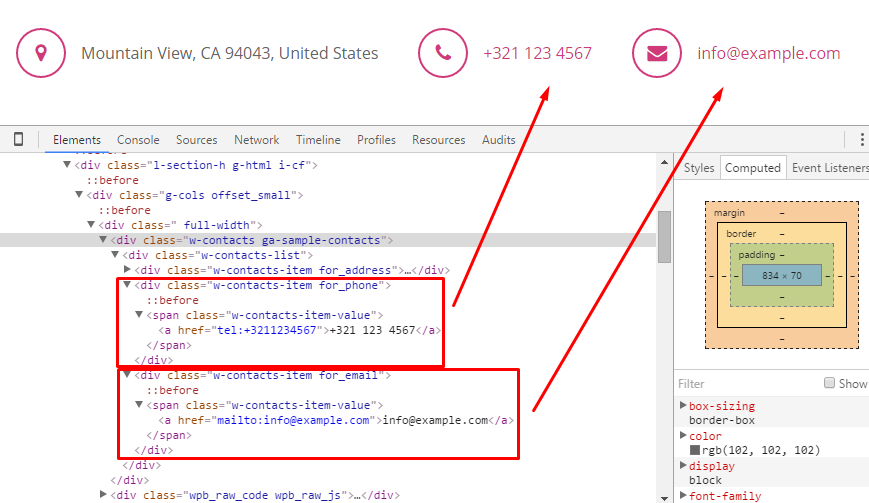
As you may notice, we have added link for phone, so when it will be clicked, phone app may be opened. Now save the page and view the result in a new tab of the browser. Then with web inspector you may find classes of inner components that may be used for onClick JS event attachment:

Having this classes in mind, add Raw JS below the Contacts element and fill it with following code:
<script type="text/javascript">
jQuery(document).ready(function(){
  jQuery('.ga-sample-contacts .w-contacts-item.for_email a').on('click', function() {
    ga('send', 'event', 'Contacts', 'click', 'Email');
  });
  jQuery('.ga-sample-contacts .w-contacts-item.for_phone a').on('click', function() {
    ga('send', 'event', 'Contacts', 'click', 'Phone');
  });
});
</script>
As you see we are adding code for 2 GA Events sending - one for email, one for a phone. We are using unique class we have added, then the class of needed component and then ‘a’ tag name, since both Phone and Email are represented with links.
Contact Form: an example of form submit #
In this example, we want to show that you can attach GA Events sending not only to a simple click but to almost any JS event happening on your page. Sometimes it is good to know how much times your contact form was submitted (this includes even cases when it was submitted but not sent due to validation errors) and compare the number with actual emails received.
In this example, we will not add a unique class to the form, since usually there is only one Contact Form element on the page. However, if you need, you can add the custom class to your form and use it your the JS code.
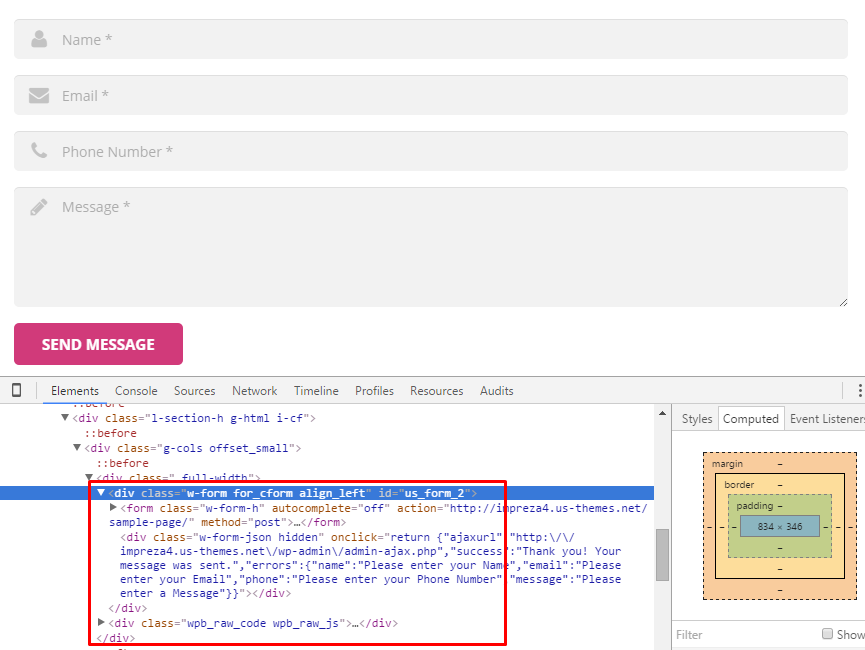
So first add the form, fill the fields, save it and update the page. Then view the page in a new browser tab and find form class using web inspector.

We will use the class of form container, ‘.w-form.for_cform’. With this in mind, adding Raw JS with the following code:
<script type="text/javascript">
jQuery(document).ready(function(){
  jQuery('.w-form.for_cform form').on('submit', function() {
    ga('send', 'event', 'Contact Forms', 'send', 'Sample Form');
  });
});
</script>
Now, each time when users will click on the form button, it will send GA Event with ‘Contact Forms’ category, ‘send’ action and ‘Sample Form’ label.
